

Functional P&L and standard P&L
A standard P&L primarily organizes activity by group account. A Functional P&L can add dimension criteria to individual nodes in the layout. For example, one salary account can contribute to separate Sales, Product, and Administration sections when the underlying transactions carry a mapped department dimension.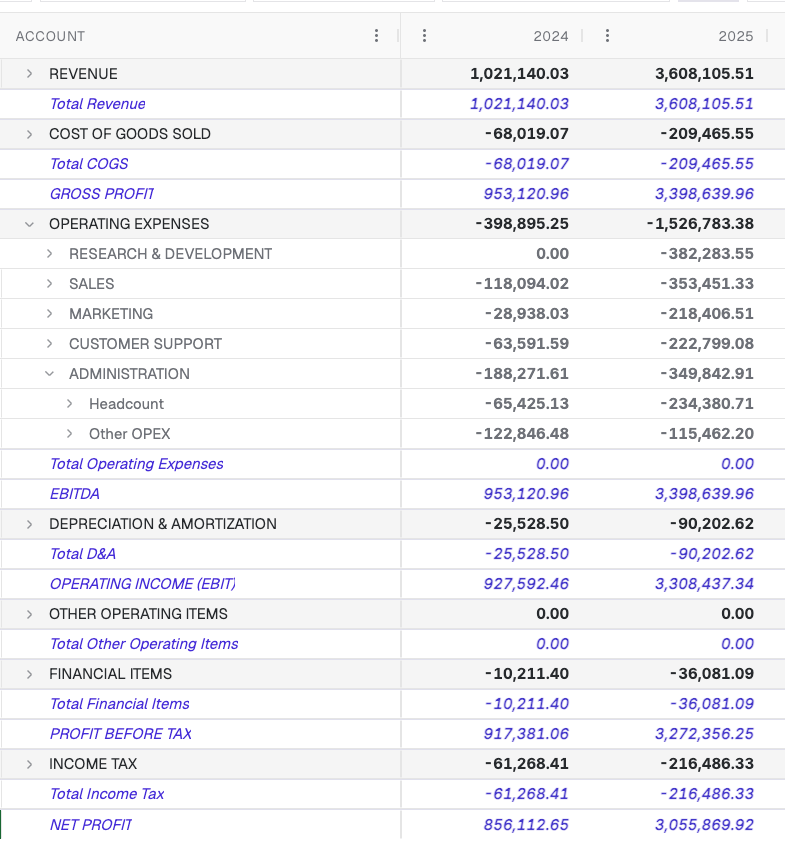
Before you begin
- Confirm that the relevant local accounts map to group accounts.
- Map the dimensions and values used to define each business function.
- Review dimension coverage for the reporting period.
- Decide how activity without the required dimension should appear.
Design the operating view
Build the high-level functions that match the management review, then add the accounts and dimension filters that define each function. Use node-level dimension filtering when:- the same account contains activity for several business functions;
- management ownership follows a department, project, region, or cost center;
- a broad account needs to be split into more decision-useful views;
- the same account needs to appear in more than one explicitly filtered placement.
Write dimension rules with Simple or Advanced mode
Each node’s dimension filter has two editing modes. Switch between them from the Simple and Advanced tabs at the top of the dimension picker. Use Simple mode when the rule is a flat list of dimension values. Values you select within one dimension are combined with OR, and dimensions are combined with each other in the way the picker already shows. This is the mode most existing layouts use, and it stays the default for new nodes. Use Advanced mode when the rule needs mixed AND / OR logic that a flat list cannot express. Advanced mode builds one or more condition groups. Within a group:- Values inside one dimension are combined with OR.
- Different dimensions inside the same group are combined with AND.
Build an Advanced rule
Open the dimension picker on a node and switch to Advanced. Any values already selected in Simple mode are converted into equivalent condition groups so the existing scope is preserved.- In the first condition group, select Add dimension and choose a dimension.
- Select Add value to pick one or more items in that dimension. Values within one dimension are ORed together.
- Add more dimensions to the same group to require all of them at once (AND).
- Select Add condition group to describe an alternative combination. Groups are ORed together.
- The Resulting filter preview at the bottom of the picker shows the expression that will be saved.
Allocate shared values with allocation keys
Use an allocation key when a shared cost or revenue is booked to one place but management wants to attribute it across entities or dimension items. An allocation key produces monthly weights on either the entity axis or one mapped dimension axis, and Control applies those weights to any account row that references the key. For example, you can allocate €100,000 of warehouse rent by each entity’s share of revenue:Live driver and manual keys
Every allocation key has a key type that determines how the weights are produced:- Live driver keys derive the weights from actuals. Each period, Control reads the selected grounding accounts per receiving item (and any grounding rows) and turns each target’s share of that sum into its weight. Weights recalculate automatically as source data changes.
- Manual keys use fixed monthly percentages that you enter yourself. Every month must total exactly 100%. Blank months fill forward from the last month you entered, so you only enter a new column when the split changes.
Build the grounding for a Live driver key
The grounding defines the driver basis that adds up to 100%. It combines four optional filters:- One or more accounts. An account is read per receiving item across the whole ledger, regardless of which sections of the layout it appears in, so “5000 Normal wages” gives each cost center its own wages even in a layout whose sections are filtered by cost center.
- One or more groups or formulas of the layout, for computed drivers such as headcount.
- A restriction to specific dimension items (for example, only the Sales department).
- A restriction to specific entities.
Create an allocation key
Open the .- Select Allocation Keys, then select New key.
- Enter a descriptive Name and choose a Key type of Live driver or Manual.
- For a Live driver key, build the Grounding: pick one or more driver accounts (searchable, each account listed once) and, if needed, group or formula rows, then optionally restrict the grounding to specific dimension items or entities.
- Under Split by, select Entity or Dimension. For a dimension allocation, also select the mapped dimension.
- Select the Target items that can receive the allocation.
- For a Live driver key, leave every item unchecked to include all eligible targets.
- For a Manual key, you must pick each target explicitly.
- For a Manual key, enter the monthly percentages in the Weights grid. Every month must total exactly 100%; blank cells fill forward from the latest entered value.
- For a Live driver key, select Preview to review the driver values and proposed weights for the latest complete month.
- Select Save key.
Assign a key to receiving items
Assigning a key is a two-step choice: first the key, then the items on that key that should receive a share.- In the Allocation Key column, open the picker on an account or group row.
- In 1 · Allocation key, choose the key (or No allocation to clear an assignment).
- In 2 · Receiving items, tick the items that should receive a share of that row. Use Select all and Clear all for bulk changes.
- Select Apply to row.
Assign a key to a whole group
Assign a key on a group row to allocate every account underneath it in the same way. Each child account inherits the group’s key and receiver selection until you assign a different key on the child, which overrides the inheritance for that row only. Inherited assignments are labelled(inherited) in the picker so you can tell them apart from assignments made directly on the row.
One allocation key can be reused by many rows, but each row uses only one key at a time. Editing a reused key updates every row that references it. Clear all assignments before deleting a key.
Verify allocated actuals
Open the . Expand an assigned account row to see one child row per selected receiver, plus an Unallocated row when the receiver selection did not cover the full amount. The Allocation Key column on each receiver row shows the weight applied for the visible periods, matching the active comparison mode. When the weight is the same in every visible period, Control shows the single percentage; otherwise it shows a range. Hover the cell to see each period’s weight. Check that:- the source row is the pool: its own dimension filter (for example Cost Center = Admin) defines what is redistributed, and the key’s targets receive it even when they lie outside that filter;
- with every receiver selected, the receiver rows add up to the source account row; with a partial selection, the selected receiver rows plus Unallocated reconcile to the original source pool while the displayed source row total contains only the selected receivers’ shares;
- each period uses that period’s driver values (for Live driver keys) or the manually entered weight;
- entity or dimension filters show the target’s allocated share without recalculating the weights from only the visible targets;
- affected subtotals and formulas use the allocated attribution; and
- the consolidated source total remains unchanged.
Receivers you did not select are treated as an intentional partial allocation. The selected receivers keep the
weights the key produced; the remainder stays on the source row as Unallocated.
Validate the result in actuals
Move from the layout into actuals and keep the period and entity selections aligned with the mapping coverage you reviewed.- Review each material function separately.
- Drill into a row and confirm that its transactions carry the expected account and dimension values.
- Compare the combined functional view with the standard P&L where the structures are intended to reconcile.
- Investigate unexplained differences as missing mappings, overlapping filters, excluded values, or deliberate management adjustments.
Filter by dimensions
Functional P&L actuals can be narrowed with a statement-level Dimensions filter in the actuals toolbar. It applies on top of the row-level dimension rules in the layout, and you can change it at any time without editing the layout. Until you select something, actuals show all activity. The filter is a searchable checklist grouped by dimension. Tick the items you want to keep. Items you select within one dimension are combined with OR; dimensions with a selection are combined with AND — the popover states this rule, and the preview line shows the resulting clause.How the filter combines with row-level rules
The statement filter and each row’s layout rule combine with AND. A transaction has to match the row’s own rule first; the statement filter then narrows what appears inside the row. The row rule keeps its structure: if a node’s rule is(Cost Center: Marketing AND Country: Finland) OR (Cost Center: Sales AND Country: Sweden) and the statement filter is Product line = Hardware, the view keeps both branches and requires Hardware inside each one. An incompatible combination correctly shows zero instead of duplicating activity.
The filter also travels into drill-down, so the transactions behind a filtered cell match the same combination.
An amount that is split across items in two or more dimensions at the same time cannot be attributed to any single
combination of items. Control excludes such amounts from figures filtered on more than one dimension. Filters on a
single dimension still attribute each part of the amount to its item, and the unfiltered view includes it in full.
Keep a filter with Saved Views
The dimension filter is part of the page URL, together with the entity and period selections, so a link to a filtered view opens with the same filter and a reload keeps it. To keep a combination you use regularly, save it as a Saved View from the toolbar and reopen it by name. Saved Views replace the named slices that earlier versions stored with the layout.Pivot items into columns
Turn on Pivot items into columns in the Dimensions popover to show one column per selected dimension item. Use it to compare the same rows across a small set of items, such as several product lines or cost centers, side by side. Requirements and limits:- Available on Functional P&L only.
- All selected items must belong to a single dimension.
- Up to 10 dimension items can be pivoted at once.
- Item pivot cannot be combined with entity pivot; enabling one turns off the other.
Important considerations
- A Functional P&L is a management view; it does not rewrite source accounting classifications.
- Dimension quality determines the reliability of the functional split.
- Duplicate account placements require deliberate, non-overlapping filters unless duplication is the intended result.
- Advanced dimension rules combine values within a dimension with OR, dimensions inside a condition group with AND, and condition groups with OR.
- The Dimensions filter combines items within a dimension with OR and different dimensions with AND. It intersects row-level layout rules with AND.
- The Dimensions filter lives in the page URL; use Saved Views to keep a combination by name.
- Item pivot shows one column per selected dimension item and requires the selection to stay within one dimension.
- Amounts split across two or more dimensions at once cannot be attributed to a combination and are excluded from figures filtered on more than one dimension.
- Allocation keys restate attribution on either the entity axis or one mapped dimension axis. They do not change source transactions or consolidated totals.
- The assigned row’s own dimension filter defines the pool; it never limits the receivers. Only the Dimensions filter on the actuals page narrows what is displayed, and it narrows the allocated result, not the pool.
- Live driver weights are period-specific. A zero or mixed-sign driver leaves the source value explicitly unallocated for that period.
- Manual keys require every month to total 100%. Unentered months fill forward from the last entered month.
- Selecting only some receivers on a row is an intentional partial allocation; the remainder stays on the source row as Unallocated and is never renormalized.
- Changes to source dimensions or mappings can change historical views when the data is reprocessed.